The art of angling is a blend of many disciplines, and a foundational element is the understanding and application of proper knot tying. Beyond simply connecting your line to a hook, the right knot is crucial for maintaining line strength, ensuring reliable connections, and adapting to diverse fishing scenarios. This comprehensive guide dives into the essential fishing knots that form the backbone of any angler’s skillset. We’ll explore the mechanics of each knot, its optimal applications, and the techniques for achieving maximum strength and durability.
5 Must-Know Fishing Knots
Every angler, from the weekend enthusiast to the seasoned pro, shares a common thread: the need for reliable knots. It’s a skill that evolves alongside our experience, becoming an integral part of our connection to the sport. This guide is designed to accelerate that journey, providing a clear path to knot mastery. Let us explore the best 5 fishing knots that build a strong foundation, enabling you to fish with confidence and peace of mind, knowing your tackle is up to the challenge.
I. Knots for Attaching Line to Hook/Lure
1) Improved Clinch Knot: The Stronger, Smarter Fishing Knot
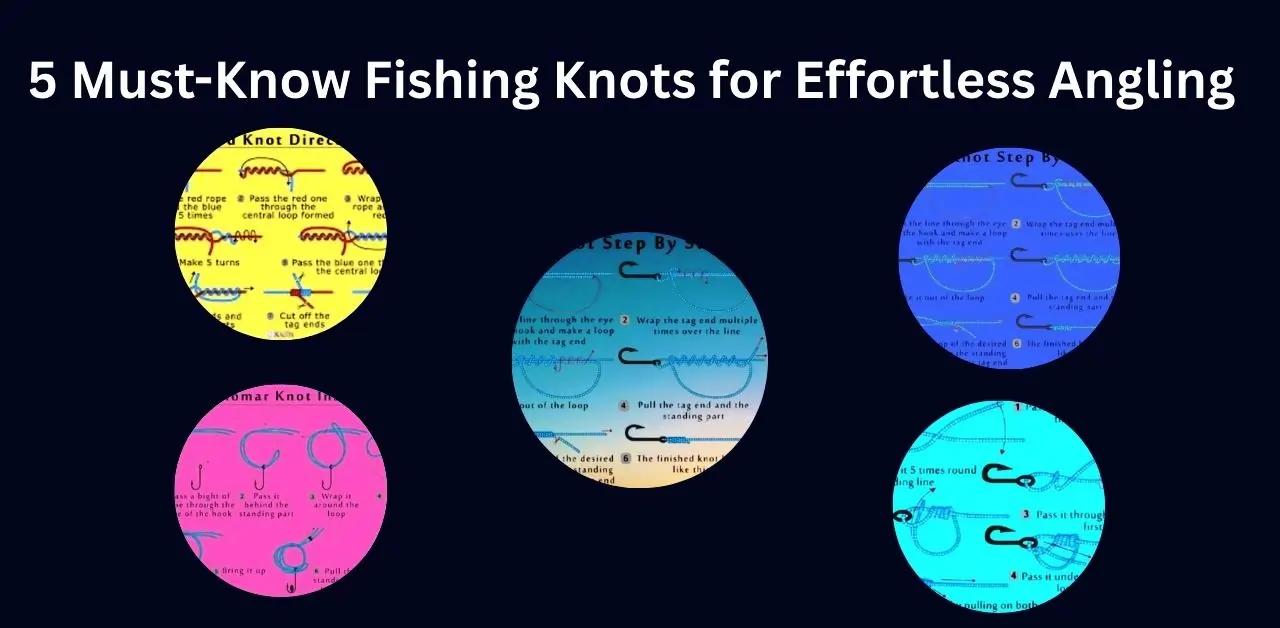
The Improved Clinch Knot is a must-know for anglers, offering superior strength and reliability when tying hooks, lures, or swivels to your fishing line. A simple upgrade from the standard clinch knot, it includes an extra tuck for added security—preventing slippage even with braided or fluorocarbon lines. Easy to tie and highly effective, this knot retains nearly 95% of the line’s original strength, making it ideal for landing big catches. Perfect for beginners and pros alike, it’s a go-to for freshwater and saltwater fishing. Steps: Thread the line, twist 5-7 times, pass through the first loop, then the new one, and tighten. Never lose a fish to a weak knot again.
Improved Clinch Knot: Step-by-Step Tying Guide
Best For:
✔ Hooks, lures & swivels
✔ Monofilament & fluorocarbon
✔ Quick, reliable everyday use
Step-by-Step Instructions:
1️⃣ Thread the Line
- Pass 6″ of line through the hook eye.
- Let the tag end hang loose.
2️⃣ Twist the Tag End
- Wrap the tag end around the standing line 5-7 times
- Keep wraps neat and tight against the eye
3️⃣ Thread Back Through
- Pass the tag end:
- Through the first loop (near hook eye)
- Then through the new big loop you just created
4️⃣ Lock It Down
- Wet the knot with saliva/water
- Pull the standing line while holding the tag end
- Slide coils tight against the eye
- Trim excess tag (leave 1/8″ for safety)
Why Anglers Love It:
✓ Retains 85-90% line strength
✓ Easy to tie with cold/wet hands
✓ More secure than standard clinch knot
Pro Tips:
• Not ideal for braided line (use Palomar instead)
• For big fish, add 1-2 extra wraps
• Test every knot with a firm pull before casting
2) Palomar Knot: The Ultimate Strong & Simple Fishing Knot
The Palomar Knot is one of the strongest and easiest knots for securing hooks, lures, or swivels to your fishing line. Known for its near 100% line strength retention, it works flawlessly with braid, mono, and fluorocarbon. Just double the line, pass it through the eye, tie a simple overhand knot, then loop it over the hook before tightening. Its double-line design prevents slippage, making it perfect for big-game fishing. Quick to tie and incredibly reliable, the Palomar is a favorite among beginners and experts alike. Never worry about weak knots again—this one won’t let you down!
Palomar Knot: Step-by-Step Tying Guide
What You Need:
- Fishing line (works with braid, mono, or fluoro)
- Hook/lure with a generous eye
- Scissors
Step-by-Step Instructions:
1️⃣ Double the Line
- Fold 6 inches of line to create a loop (doubled line).
- Pass the loop through the hook/lure eye.
2️⃣ Tie a Loose Overhand Knot
- Let the hook hang loose.
- With the loop, tie a simple overhand knot (don’t tighten yet!).
3️⃣ Loop Over the Hook
- Pull the loop down and pass it completely over the hook/lure.
4️⃣ Wet & Tighten
- Moisten the knot (reduces friction heat).
- Pull both ends of the standing line to tighten.
- Trim the tag end close to the knot.
Why It’s Great:
✔ 95-100% line strength retention
✔ Works with braided line (unlike many knots)
✔ Easy to tie, even in low light
Pro Tips:
- Use with larger eyes (tight eyes make Step 3 tricky).
- For small lures, leave a tiny tag to prevent slippage.
- Always test the knot with a firm pull before fishing.
II. Knots for Joining Lines
3) Blood Knot
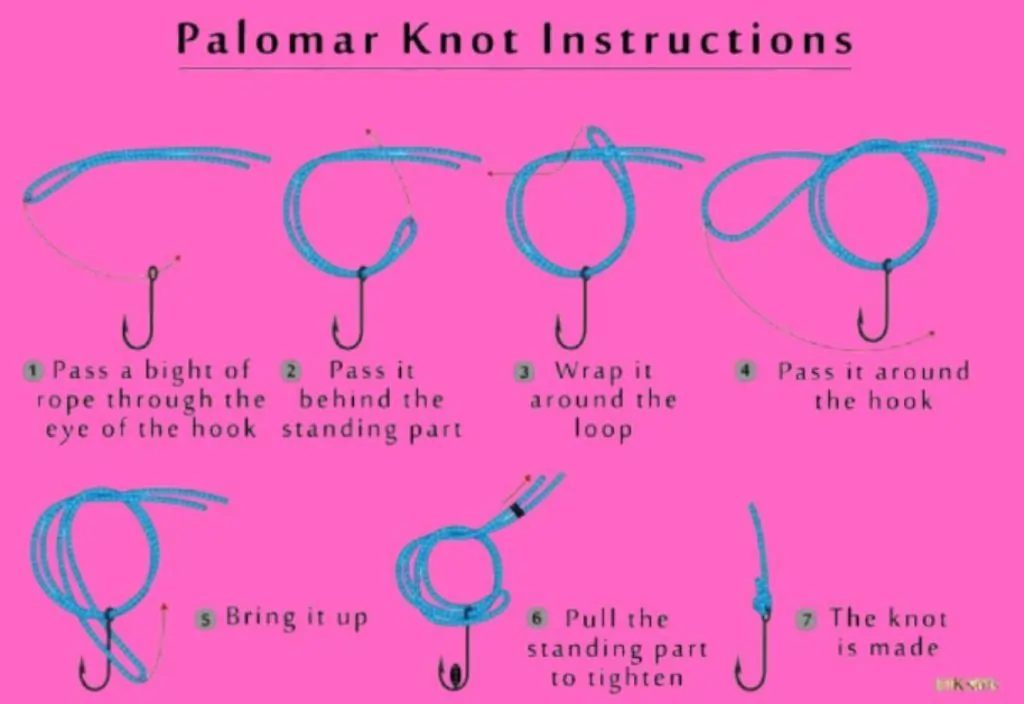
The Blood Knot is a popular and effective fishing knot used to join two pieces of fishing line or tippet material. Ideal for attaching different line types or extending the length of a line, it creates a strong, reliable connection. The knot is tied by overlapping the two lines, then wrapping one around the other multiple times before passing the ends through the loop. After tightening, the knot should be moistened for a secure finish. Known for its strength and slim profile, the Blood Knot is often used in fly fishing to connect leader lines to tippet material, providing a smooth and durable join.
Blood Knot: Step-by-Step Tying Guide
What You Need:
- 2 lines of similar thickness (mono/fluoro)
- 5-6 inches of overlap
- Scissors
Step-by-Step Instructions:
1️⃣ Overlap Lines
- Lay the two lines parallel, overlapping by 5-6 inches.
2️⃣ Twist First Line
- Take the left line and wrap it 4-5 times around the right line.
- Bring the tag end back through the gap between the two lines.
3️⃣ Twist Second Line
- Repeat with the right line: wrap 4-5 times around the left line.
- Bring its tag end back through the same gap (opposite direction).
4️⃣ Tighten & Trim
- Moisten the knot (reduces friction).
- Pull both standing lines slowly to seat the wraps.
- Trim the tag ends close to the knot.
Pro Tips:
✔ Best for: Joining mono/fluoro leaders to mainlines.
✔ Avoid with braid (use a Double Uni instead).
✔ Keep wraps neat—overlapping coils weaken the knot.
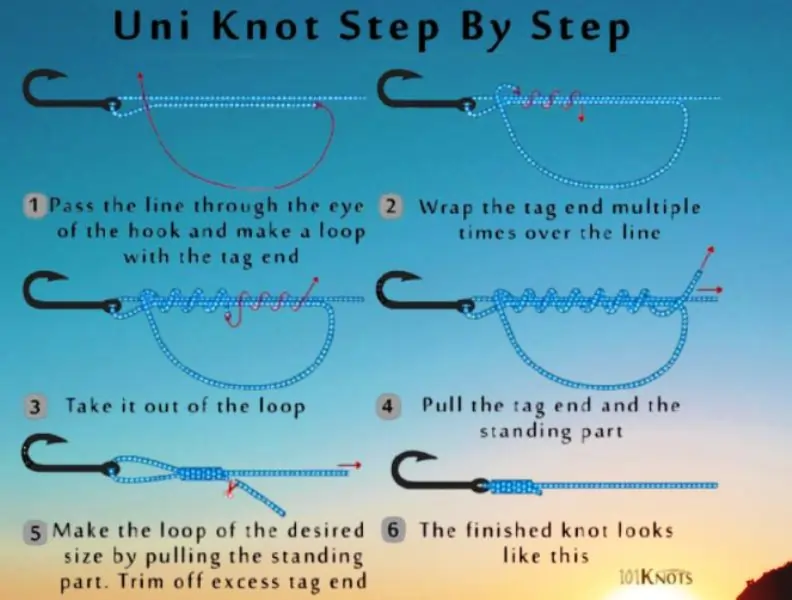
4) Uni Knot as a Line Joiner: The Versatile & Reliable Connection
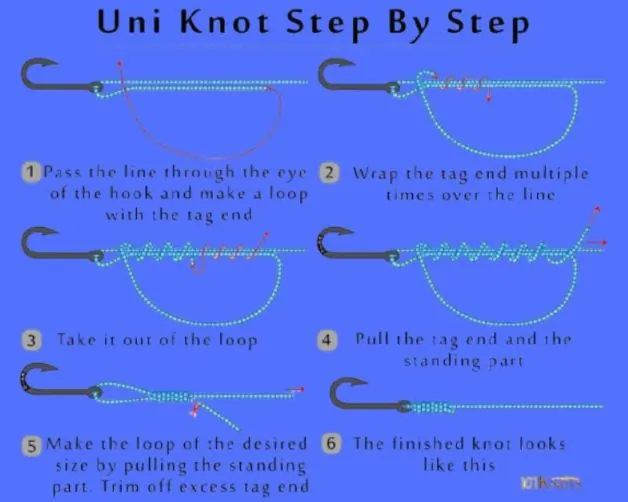
The Uni Knot is a must-know knot for anglers looking to securely join two fishing lines of similar or different diameters. Renowned for its strength and simplicity, it maintains up to 90% line strength, making it ideal for connecting monofilament, fluorocarbon, or braided lines.
How It Works:
- Overlap the two lines.
- Tie a Uni Knot with the doubled section (6-8 wraps).
- Repeat on the opposite line.
- Lubricate and pull tight for a smooth, snag-free connection.
Perfect for leader-to-mainline setups, this knot is easy to tie, resists slipping, and works in both freshwater and saltwater. Whether you’re targeting trout or tuna, the Uni Knot ensures a durable, streamlined join that won’t fail under pressure.
Uni Knot as a Line Joiner: Step-by-Step Tying Guide
Best For:
✔ Mono to mono ✔ Fluoro to fluoro ✔ Braid to leader
✔ Joining different diameter lines
✔ Saltwater & freshwater applications
Step-by-Step Instructions:
1️⃣ Overlap Lines
- Lay both lines parallel with 6-8″ overlap
2️⃣ First Uni Knot (Line 1)
- With Line 1, make a loop around Line 2
- Wrap the tag end 4-6 times (more wraps for thinner/slippery lines)
- Pass tag end back through the loop
- Moisten and tighten partially (don’t trim yet!)
3️⃣ Second Uni Knot (Line 2)
- Repeat with Line 2: loop around Line 1
- Match same number of wraps
- Pass tag end through its loop
4️⃣ Final Cinching
- Lubricate both knots
- Pull standing lines in opposite directions
- Knots will slide together and lock
- Trim tags close (leave 1/8″)
Pro Tips:
• Braid to leader: Use 5-7 wraps on braid side, 4-5 on leader
• Different diameters: More wraps on thinner line
• Test strength by pulling firmly before fishing
III. Special Situations
5) Snell Knot: The Ultimate Hook-Securing Knot for Maximum Strength
The Snell Knot is a time-tested favorite among anglers for creating a direct, powerful connection between line and hook. Unlike traditional knots, it wraps around the hook’s shank, aligning force perfectly for better hooksets and reduced slippage. Ideal for circle hooks, bait fishing, and heavy-game angling, this knot maintains nearly 100% of the line’s strength while ensuring the hook always points upward for optimal penetration.
Why It Stands Out:
- Superior leverage for solid hooksets
- Works with mono, fluoro, and braid
- Perfect for live bait presentations
Easy to tie once mastered, the Snell Knot is a must-learn for bottom fishing, catfishing, or offshore adventures. Its unique design outperforms standard knots when brute strength matters most.
Step-by-Step Snell Knot Tying Guide
What You Need:
- Fishing line
- Hook (best with bait-holder or circle hooks)
- Steady hands
Instructions:
1️⃣ Thread & Loop
- Pass 6-8″ of line through the hook eye from the front, leaving a long tag end.
- Form a loop along the hook shank.
2️⃣ Wrap the Shank
- Pinch the loop against the shank.
- Wrap the tag end 5-7 times around both the shank and standing line (keep wraps tight and neat).
3️⃣ Secure & Tighten
- Pull the tag end to slide wraps toward the eye.
- Lubricate with water/saliva, then pull standing line slowly to lock the knot.
- Trim excess tag end.
Pro Tips:
✔️ Wet the knot to prevent friction damage.
✔️ Use for circle hooks—the Snell’s alignment ensures perfect hooksets.
✔️ Practice with thicker line first for easier learning.
Conclusion
In conclusion, mastering the 5 must-know fishing knots is essential for any angler looking to improve their efficiency and success on the water. Whether you’re tying a simple Overhand Knot, the versatile Improved Clinch Knot, or the strong Blood Knot, each knot has its unique advantages in different fishing scenarios. The Loop Knot and Palomar Knot also offer excellent performance for attaching hooks and lures, ensuring that your gear stays secure under pressure.
By practicing these knots and understanding when and how to use each, you’ll gain more confidence, save time, and reduce the risk of losing fish due to weak connections. With these knots in your skill set, you’ll be well-equipped for an enjoyable and successful fishing experience, no matter your skill level or target species. Keep practicing and refining your techniques, and you’ll be an angling pro in no time! Happy fishing!